 30 minutes | Tools
Once you have found an illustration, you might want to do some basic editing such as cropping, resizing, do some color processing and add some text. In this practical sheet, we will use an Open-source software for image editing called GIMP
GIMP software presentation
GIMP is an Open-source image editor, available on Linux, Mac OS and Windows. Please go to GIMP website to download and install it. Once you’ve read this practical sheet, if you need further assistance with GIMP, please read the official documentation.
Interface overview
GIMP is highly customizable to best fit your needs. You can see on the screenshot below how a freshly installed GIMP would look like, and what are the main areas of interests.
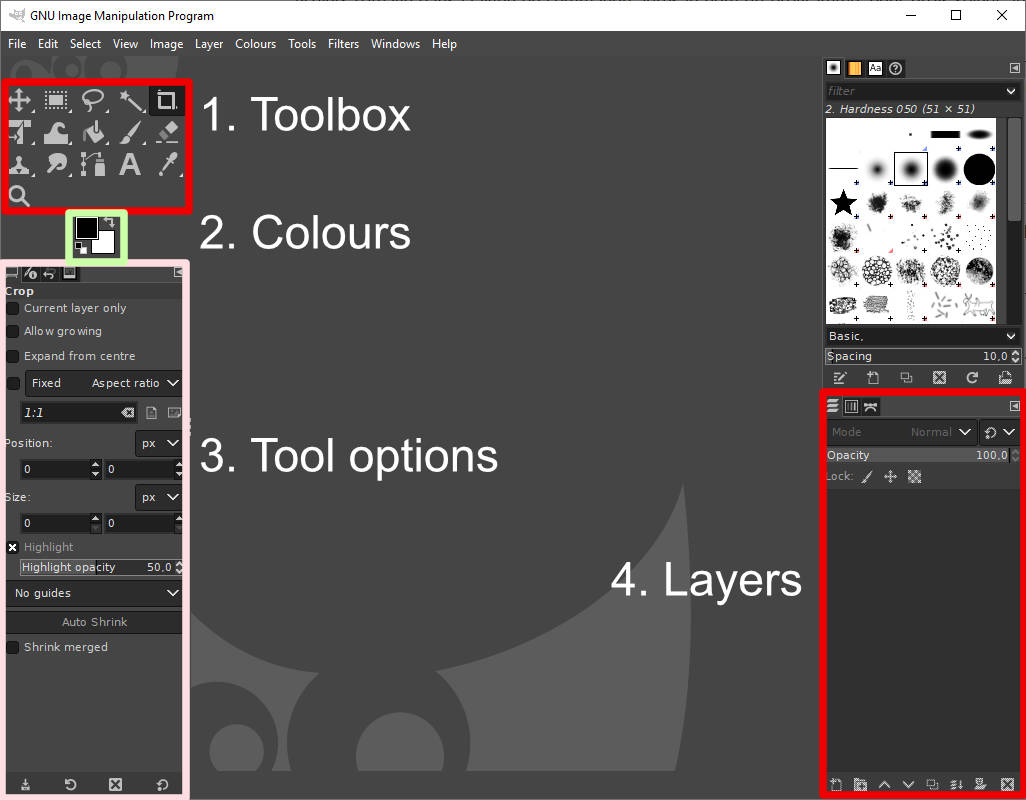
- You can find the toolbox at the top-left. Several tools are available and we will see some of them for this practical sheet.
- Colours are accessible through this module, represented by two square on top of each other. The square on the left is the foreground colour, and the square on the right is the background colour. You can invert their position with the arrows on the top-right. To modify the coulours, click on a square to access the color picker.
- This window will display tool options for the tool selected in the toolbox. Please note there are several tabs at the top of the Tools options area with specific roles.
- GIMP uses layers to apply non-destructive modifications and overlapping informations and graphics. Layers will appear in this area Once we open a file.
Once you open an image, the central gray area (with the GIMP head) will display the image.
Basic actions
Open an image
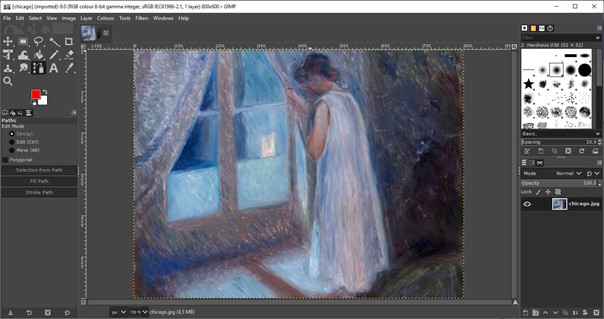
To open an image, go to File > Open, and Select your image.
Now you can see your picture in the central area and in the layers section, at the right.
Add some text
To add some text, first pick the Text tool in the Toolbox (top-left section) ![]()
Then, with the Text tool, draw an area where you want to write your text. You can still move this area later.
Once your text area is drawn, you can type your text and change colors and fonts.
Once you’re done writing, press Escape or click on another tool.
You can move your text area by selecting the Move tool ![]() and selecting your text area to move it around.
and selecting your text area to move it around.
Save the image
To save an image after your modifications, go to File > Export as.
An export window will appear: You can select the folder you want to save your image, and you can change the file format in “Select File Type” at the bottom.
Then, click Export. If a pop-up window appear, read the next section “Export Options”
Export option
You can keep the by-default options and checked boxes as it is in the export window, except if you’re exporting to JPEG.
The most important option in JPEG export is the Quality cursor, at the top.
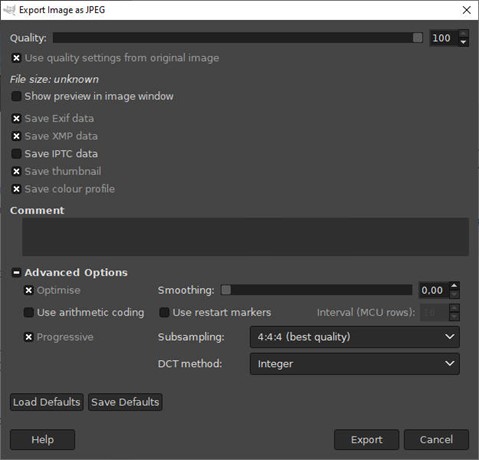
When the Quality is at 100, the file will be compressed lightly to keep the most of the details, resulting in a heavy file.
On the other hand, lowering that value will give you a lighter file, but the compression will deteriorate your picture.
Depending on your priorities, you can do some tests and change this value. Avoid to go below Quality 80, and in case of doubt, keep a Quality close to 100.
Please note that exporting again and again a JPEG file will inevitably damage your picture because the compression will build up on it.
Export or save?
Under File menu, you can find Save and Save as. This option will create a GIMP working file you can use to save your modifications, but it will not behave as a standard picture. This option is to be used if you plan keeping a working version of your picture to do some editing in the future.
Resizing cropping, collage
We will now see how to do some basics modifications to an image in order to change its size (Resizing), to isolate a part of an image (Cropping), and to assemble several elements (Collage).
Resizing
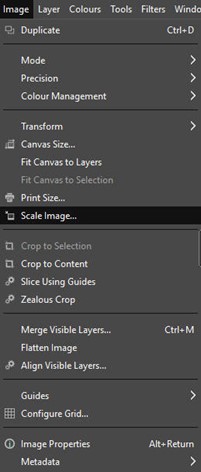
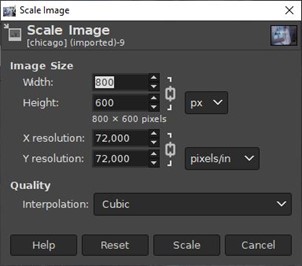
In Menu>Image, several tools will help you change the height and width of your picture.
- Scale Image (see screenshot below) will change the width and height of your image. This is the tool you will use to export to a given width and height.
- Transform will rotate your picture
- Canvas size will change the work area available. Please see Cropping down below for more information.
Cropping
Cropping is like cutting inside the picture to isolate an area. It is useful when you want to assemble several parts of different images (see Collage section down below), or when you want to isolate a part of your picture, like removing the frame or a border.
Cropping is done with the Crop tool ![]() in the Toolbox, or when you are reducing the Canvas size (Menu > Image > Canvas Size). We will use the Crop tool to isolate an element in this practical sheet.
in the Toolbox, or when you are reducing the Canvas size (Menu > Image > Canvas Size). We will use the Crop tool to isolate an element in this practical sheet.
How to use the Crop tool :
- Select the tool in the Toolbox on the top-left
- Drag-and-drop on the picture to define the area you want to isolate
- Press Enter to crop your image
You can now export your cropped picture.
Collage
You might want to have several pictures inside the same file in order to organize them on layers and make collage.
Import several pictures to your current workspace
To import more pictures to your current workshape, go to File>Open as Layers : you will see your newly imported pictures in the layers list on the right.
Resize pictures in a collage
Chances are your pictures have different dimensions and importing them inside a small workspace (or “Canvas”) can complicate their manipulation. You can change the size of the canvas in Image > Canvas Size.
Another solution is to reduce the large pictures you have imported. To do so, select the layer containing your large picture, and go to Menu Layer > Scale Layer.
Advanced Editing
We saw how you can edit the size of an image, how to crop it and assemble it with others. Now we will see how to modify onwards an image.
Merging layers
You will notice that editing tools affect only one layer at a time. If you want to modify the colors or apply curves and filters as described below to the whole image, layers need to be merged.
To do so, you can right-click on a layer and select “Merge down” to combine it with the layer just under.
Colors
Most of the operations on colors are accessible from Menu Colours >.
Black and white
To turn your image to black and white, several options are available. One of the easiest is to go to Menu Coulours > Desaturate > Colour to Grey
Saturation
You can fine-tune many parameters with a curve, if you already know how to use them (see next section Curves), otherwise, in Menu Colours > Hue Saturation, you can change the hue and saturation of your image.
Curves
Curves are powerful tools you can find in Menu Colours > Curves. The shape of the curve will transform the values in a certain way, changing contrast and making tonal adjustments.
Filters
GIMP has several filters by default, and you can find them in Menu Filters >. Filters are very diverse and have a lot of functionalities you can explore. One of them is Filters > Blur > Gaussian Blur. It is useful if you want to blur an image or an area.